
Looking for a simple yet impressive treat? These individual-sized delights are perfect for any occasion. With a creamy texture and customizable flavors, they’re a crowd-pleaser without the hassle of baking.
The best part? You only need a few basic ingredients like cream cheese, graham crackers, and whipped cream. A quick chill in the fridge sets them perfectly, making them ideal for busy schedules.
Whether you’re hosting a party or craving a sweet bite, this recipe adapts to your needs. Swap crusts or toppings to match your taste—endless options await!
Key Takeaways
- Perfect single-serve treats with no oven required
- Ready in just 3 hours of chilling time
- Uses muffin pans and liners for easy shaping
- Light, mousse-like texture from whipped cream
- Great for parties, holidays, or quick cravings
Why You’ll Love These No Bake Cheesecake Mini Desserts
Skip the oven but keep the wow factor. These treats deliver a creamy, airy texture—like a cross between mousse and classic cheesecakes—without the density of baked versions. Perfect for when you crave indulgence without the effort.

Creamy, Light, and Perfect for Portion Control
Each bite is fluffy, thanks to whipped cream folded into the filling. Pre-portioned cups help manage servings, so you enjoy just the right amount.
“My guests couldn’t believe they were homemade!”
No Oven Required—Just Your Refrigerator
Forget worrying about cracks or overbaking. A 3-hour chill in the refrigerator sets these cheesecakes perfectly. Ideal for small kitchens or hot summer days when oven use feels unbearable.
Add a dash of *vanilla extract* for depth, or let kids pipe the filling for fun. Make them ahead for stress-free entertaining—they’re as practical as they are delicious.
Essential Ingredients for Mini Cheesecakes
Every great dessert begins with the right components—here’s what you need. From the buttery crust to the fluffy filling, each ingredient plays a vital role. Let’s break down the essentials.
Graham Cracker Crust: The Buttery Base
The crust is the foundation. Use graham cracker crumbs (16 sheets = 2 cups) mixed with melted butter and a touch of brown sugar. The ratio? For every 1.5 cups crumbs, add 4 tbsp butter and 1 tbsp sugar.
No graham crackers? Digestive biscuits work as an international swap. Press the mixture firmly into cups for a crisp base that holds its shape.
Cream Cheese Filling: Fluffy and Rich
Opt for brick-style cream cheese, not spreads. The latter contains additives that prevent proper setting. Full-fat versions blend smoothly with sugar and vanilla for a rich, tangy flavor.
Pro tip: Let the cream cheese soften at room temperature. This avoids lumps and ensures a silky texture.
Heavy Whipping Cream: The Secret to Stiff Peaks
Heavy whipping cream (30%+ fat) whips into stiff peaks, giving the filling its airy lift. Lower-fat alternatives like half-and-half won’t hold shape. For a UK substitute, try double cream.
Store leftover ingredients airtight: crumbs for 2 weeks, cream cheese for a month, and cream for 5 days. Now you’re ready to assemble!
How to Make the Perfect Graham Cracker Crust
A flawless crust makes all the difference in your dessert. Get it right with these simple steps for texture, flavor, and hold.
Crushing Graham Crackers for the Right Texture
Fine graham cracker crumbs ensure a smooth base. Use a food processor for even results in seconds. No processor? Seal crackers in a bag and roll with a pin.
Pro tip: Pulse until sandy—over-processing turns the mixture powdery. Aim for 2 cups of cracker crumbs per 12 servings.
Mixing with Melted Butter and Brown Sugar
Combine crumbs with 4 tbsp melted butter and 1 tbsp brown sugar per 1.5 cups crumbs. Brown sugar adds moisture, while butter binds the crust.
Test cohesion: Squeeze a handful—it should clump without crumbling. Too dry? Add ½ tbsp more butter.
To Bake or Not to Bake? A Quick Tip
For extra sturdiness, bake the mixture at 350°F for 5 minutes. Unbaked versions work but may soften faster with juicy toppings.
- Baked: Crisp, holds shape for days.
- Unbaked: Softer, best served chilled.
Press crumbs firmly into cups—sides first, then the base. A bowl or glass bottom helps compact evenly.
Preparing the No-Bake Cheesecake Filling
The filling is where the magic happens—light, creamy, and full of flavor. With a few tricks, you’ll achieve a mousse-like texture that’s irresistibly smooth. Let’s break it down step by step.
Whipping Heavy Cream to Stiff Peaks
Use *heavy whipping* cream straight from the fridge for maximum volume. Chill your *bowl* and beaters for 10 minutes first—this helps *stiff peaks* form faster.
Whip on medium-high for 3 minutes. Stop when the cream holds its shape when lifted. Over-whipping turns it grainy; under-whipping won’t support the *filling*.
Combining Cream Cheese, Sugar, and Vanilla
Softened *cream cheese* is key. Beat it with powdered sugar (finer texture) and 1 tsp *vanilla extract* until lump-free. A splash of *lemon juice* brightens the flavor.
Pro tip: Scrape the *bowl*’s sides often to ensure even mixing. Room-temperature *cream cheese* blends seamlessly.
Folding in Whipped Cream for Airiness
Gently fold the whipped cream into the *cream cheese* mix in thirds. Use a spatula and scoop from the bottom—this keeps the filling light.
- Tool Tip: A stand mixer whips cream faster, but a hand mixer works too.
- Fix Lumps: If the *filling* is lumpy, briefly pulse with a hand blender.
Your mixture should look like fluffy clouds. Pour it into crusts immediately to set the perfect texture.
Assembling Your Mini Cheesecakes
Now comes the fun part—putting it all together! Whether you’re aiming for polished perfection or rustic charm, a few tricks ensure your treats look as good as they taste.
Piping vs. Spooning: Which Is Easier?
For neat, professional domes, a piping bag with a star tip works best. It controls the cheesecake filling flow and adds decorative swirls. No piping bag? Snip the corner of a ziplock bag—it’s a quick hack!
Spooning is faster but may leave uneven texture. Use a cookie scoop for consistent portions if precision matters less.
How Much Filling to Use per Cup
Two tablespoons of filling per cup creates the ideal height—enough to showcase toppings without overflowing. Overfill? The liner may separate. Underfill? The crust dominates.
Pro tip: Tap the tray lightly to settle the filling and eliminate air pockets.
- Star Tip: Creates elegant ridges for sauces to cling to.
- Round Tip: Smooth finish, ideal for glossy toppings like ganache.
- Altitude Adjustment: At high elevations, reduce filling to 1.5 tbsp to account for expansion.
“Piping gave mine a bakery-worthy finish—totally worth the extra minute!”
Chilling and Setting Your Desserts
The secret to flawless consistency lies in proper refrigeration. Cold temperatures stabilize the ingredients, creating a smooth, velvety texture. Unlike freezing, which can crystallize the cream, chilling preserves the dessert’s integrity.
Why Your Refrigerator Wins Over the Freezer
Freezing disrupts the emulsion, causing separation and graininess. Refrigeration gently sets the mixture, allowing flavors to meld. For best results, keep desserts at 34–38°F.
| Method | Texture | Time | Best For |
|---|---|---|---|
| Refrigeration | Creamy, firm | 3+ hours | Immediate serving |
| Freezing | Icy, crumbly | 30+ minutes | Long-term storage |
Timing Is Everything
A 3-hour chill sets the base, but overnight yields optimal firmness. Test doneness by pressing lightly—it should spring back slightly. For faster results, place the tray on an ice bath for 90 minutes.
- Condensation Fix: Store uncovered for 10 minutes before wrapping.
- Serving Tip: Let sit at room temp for 5 minutes to enhance flavor.
“Patience rewards you with that perfect, melt-in-your-mouth bite.”
Creative Topping Ideas for Mini Cheesecakes
Transform your treats with vibrant toppings that wow. The right garnish adds color, texture, and a burst of flavor—turning simple cups into showstoppers. Whether you prefer fruity, decadent, or crunchy finishes, these ideas inspire endless variety.
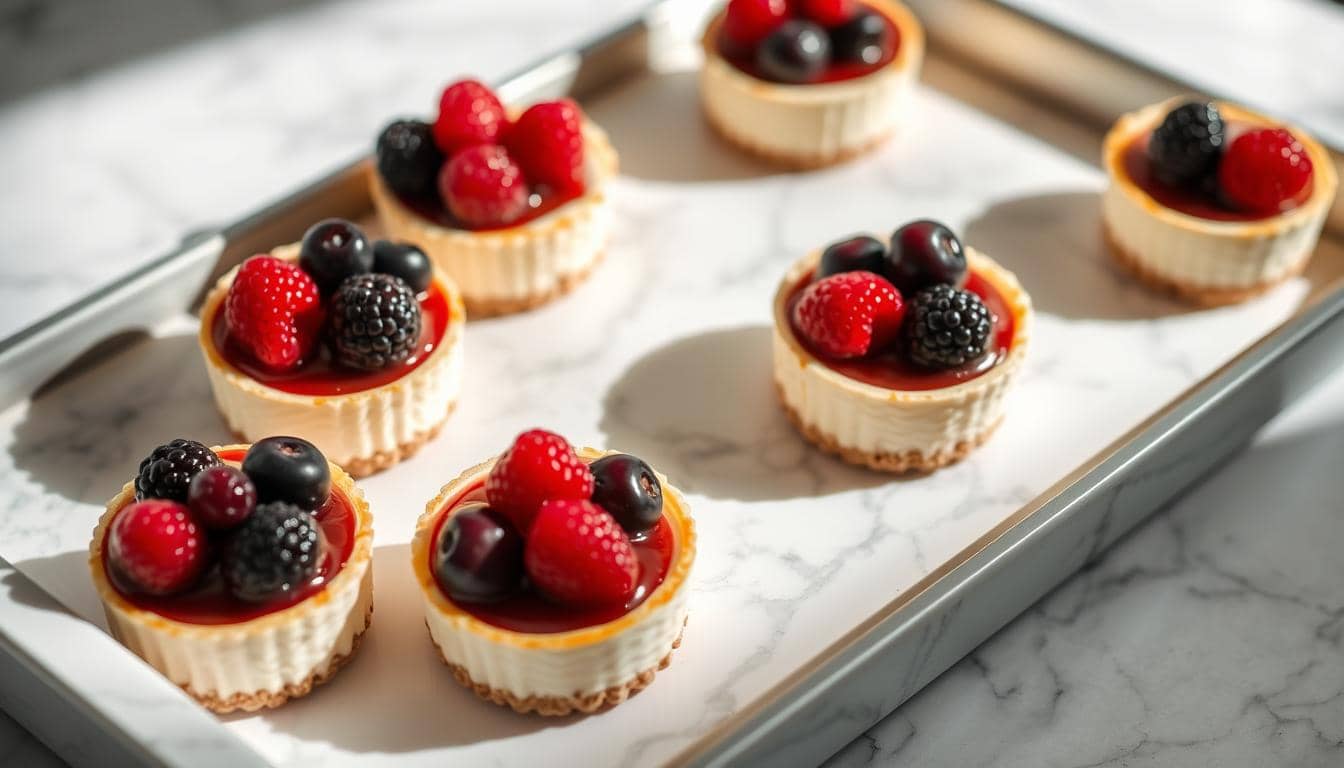
Fresh Berries and Strawberry Sauce
Fresh berries like raspberries or blueberries add a juicy contrast to creamy fillings. For a glossy finish, drizzle homemade strawberry sauce: simmer 1 cup chopped berries with 2 tbsp sugar until thickened. Cool before spooning over desserts.
Pair with mint leaves for a pop of green. Seasonal fruits (peaches in summer, pomegranate in winter) keep toppings exciting year-round.
Lemon Curd, Caramel, or Chocolate Ganache
Tangy lemon curd balances richness—swirl it into the filling or layer on top. For caramel, warm store-bought sauce slightly for easy drizzling. Pre-chill ganache (1:1 cream and chocolate) for a thick, glossy finish.
- Texture Play: Sprinkle crushed nuts or toffee bits over caramel for crunch.
- Allergy-Friendly: Use dairy-free chocolate or coconut whipped cream.
“The lemon-blueberry combo got rave reviews at my brunch!”
Holiday twist? Top with crushed candy canes or edible glitter. Just add toppings after chilling to maintain texture. Now, watch them disappear!
Storing and Freezing Tips
Keep your treats fresh and ready to enjoy anytime with these storage tips. Whether you’re prepping for a party or saving leftovers, proper techniques lock in flavor and texture.
Keeping Them Fresh in the Fridge
Store your desserts in the refrigerator for up to 5 days. Use an airtight container to prevent odors from seeping in. For stacked layers, separate with wax paper to avoid sticking.
Pro tip: Place a paper towel in the container to absorb excess moisture. This keeps the crust crisp and the cream cheese filling smooth.
Freezing for Later Enjoyment
Freeze individual portions for up to 3 months. Wrap each dessert in plastic, then foil, or use a freezer-safe bag. Label with the date to track freshness.
| Method | Duration | Best For |
|---|---|---|
| Refrigeration | 5 days | Short-term storage |
| Freezing | 3 months | Batch prep |
Thaw frozen cheesecakes overnight in the fridge. For a quick fix, microwave at 10-second intervals. Revive crystallized fillings by whisking with a splash of cream.
- Travel Tip: Pack in a cooler with ice packs for parties.
- Discard Signs: Off smells or discolored ingredients mean it’s time to toss.
“Frozen ones taste just as good—my secret for last-minute guests!”
Conclusion
You’ve mastered the art of effortless indulgence with this recipe. The balance of a buttery crust and fluffy cream cheese filling proves simplicity can be stunning. Customize flavors—try citrus zest or espresso powder—to make it yours.
Pair these treats with coffee for brunch or sparkling wine for evenings. Share your creations online—tag #SweetSuccess to inspire others. For more ideas, explore our berry-swirled or salted caramel variations.
Readers rave about the velvety texture: “Better than bakery versions!” Pro tip? Garnish with edible flowers for instant elegance. Now, savor every bite of your perfect mini delights!